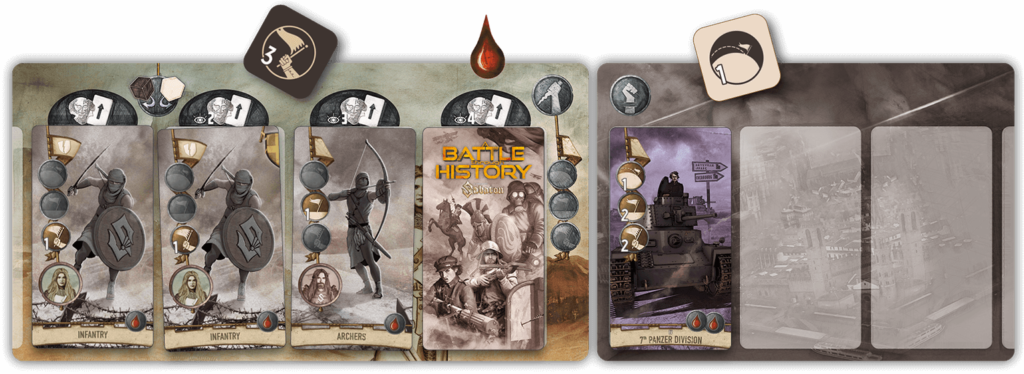
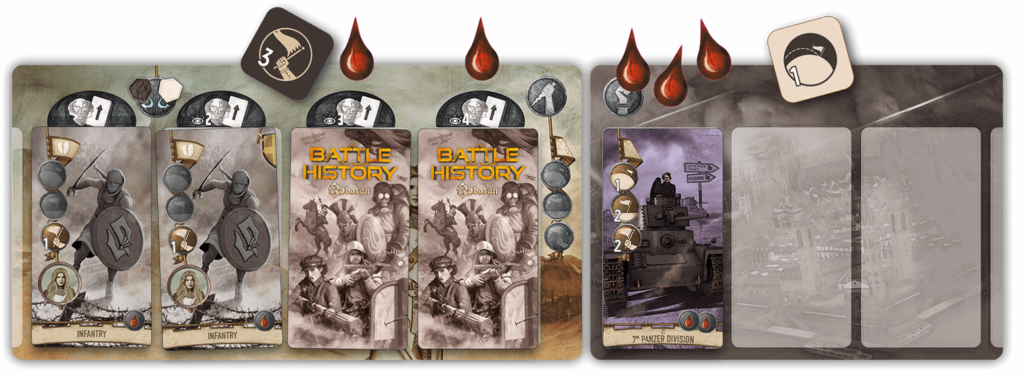
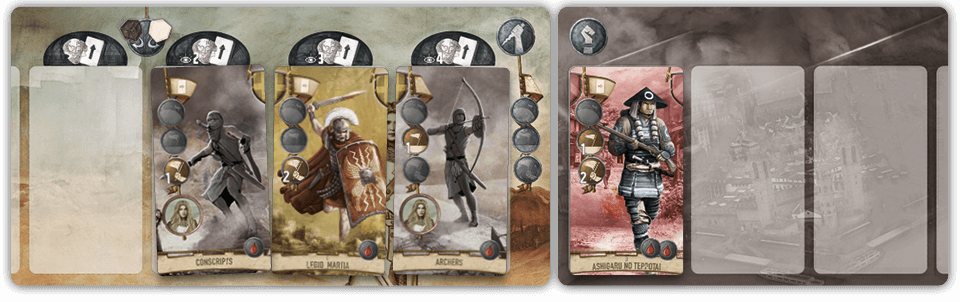
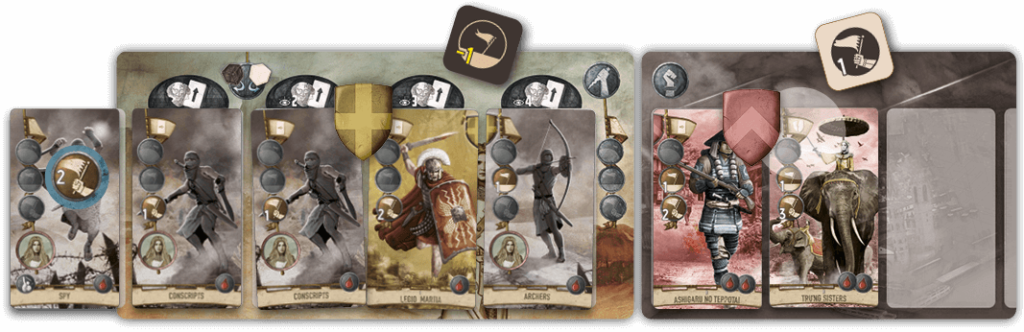
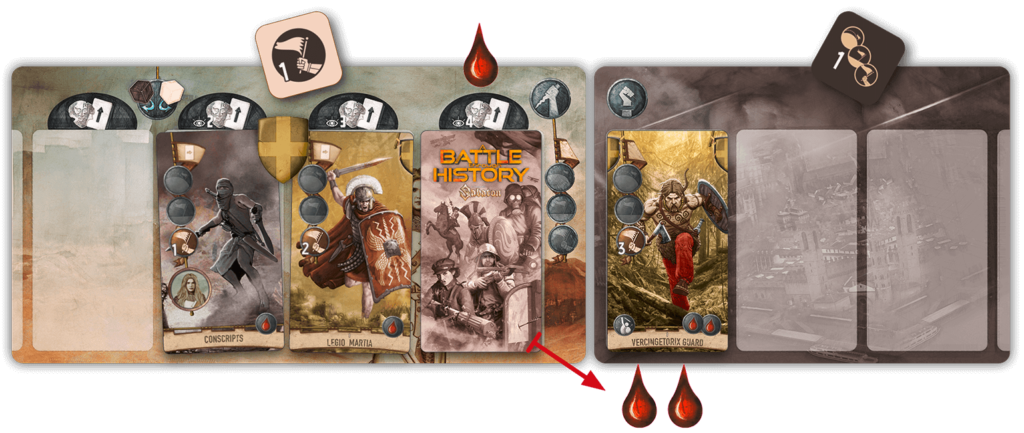
Tommy travels to era IV and decides it’s worthwhile risking to face the 7th Panzer Division. It would take some luck, but he has a Warfare token that allows for the reroll of the die, so the risk is mitigated. He deploys, in order from right to left, Trebuchet, Archers, and two Infantry units. He deploys this way so that the units that attack first can sustain the damage, shielding melee units to increase their chance to survive until the end of the combat.
Neither the defender nor the attacker have Reinforcements.
Neither the defender nor the attacker have formed Links, therefore the 2 Assault icons from the Infantry units have no effect.
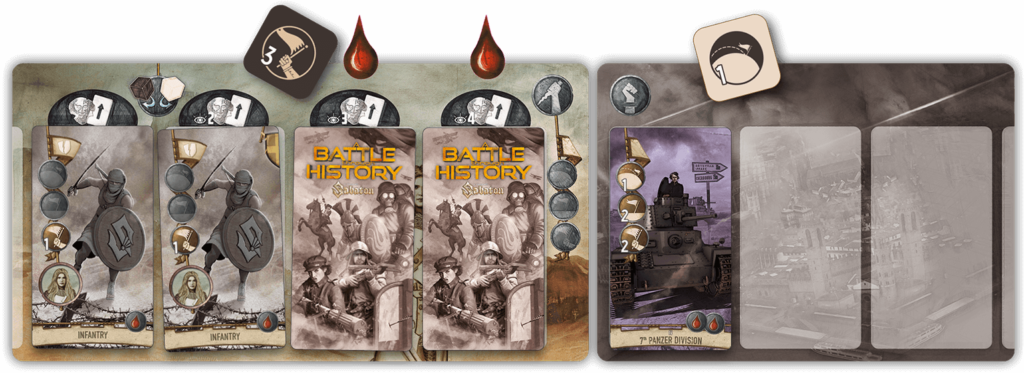
Tommy also has a +2 Close Combat Warfare token, but he decides to save it for later.
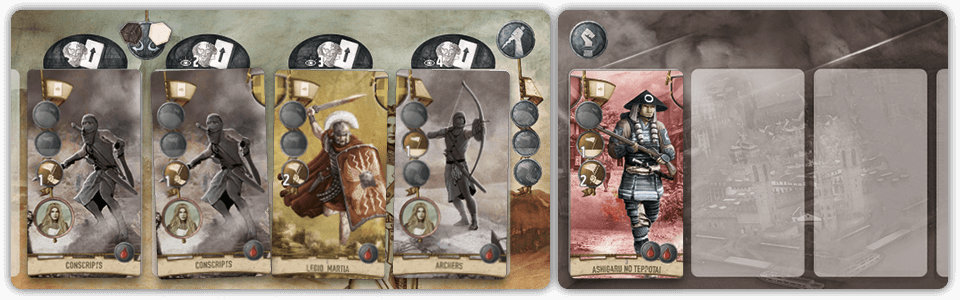
Risky De
Strong Die
Having deployed more than 3 cards, Tommy rolls the Risky diefor himself and the Strong die for the defender. Looking at the results, he looks forward trying to compute the rest of the combat in his head, and sees that he got lucky. He therefore avoids spending the reroll Warfare token. Let’s see what happens.
During the Long-Range Combat, the 7th Panzer Division has a total of 2 (including the die), while Tommy’s Trebuchet contributes for 1. The defender inflicts 1 damage to the Trebuchet, because it’s at the battlefront, and that’s enough to destroy it.
During the Medium-Range Combat, the defender still beats Tommy’s units 2 to 1, therefore the Archers are defeated as well (because they are the surviving unit nearest to the battlefront).
However, in Close Combat Tommy’s Infantry units plus the value rolled on the die sum up to a total of 5 against the 2 of the 7th Panzer Division. The difference is 3, and 3 damage is more than enough to defeat the defender, which only has 2 Damage Icons.
Tommy has won the battle, because he has more surviving units (2) than the defender (0). He checks the board and the reward for winning a battle with 4 deployed units is 1 relic card drawn from the top of the deck. Also, he adds to his discard pile all units he has defeated; in this case, the 7th Panzer Division only.
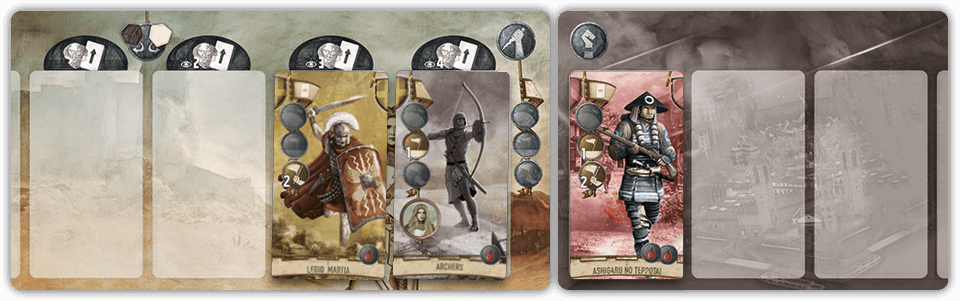
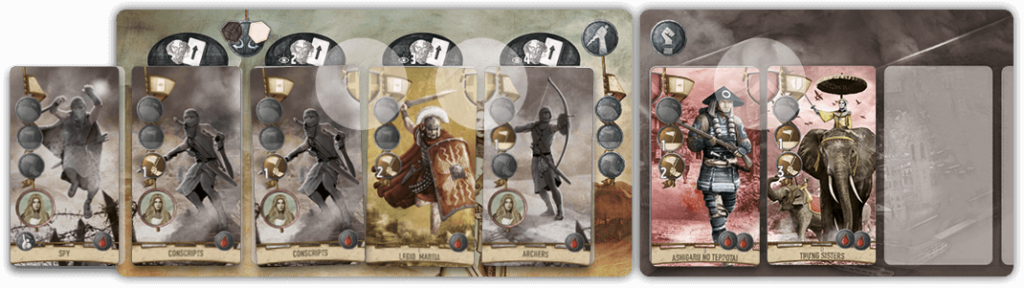
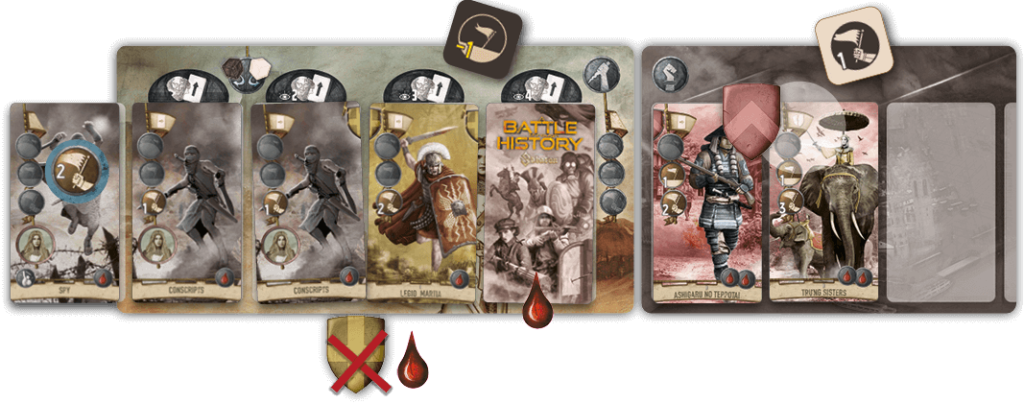
Later in the game Tommy decides to move to era II, and he’s confident to defeat the Ashigaru no Teppotai. He sees that they will call Reinforcements, but Tommy doesn’t need to wipe out the entire opposing battleline to win. Tommy deploys only 2 units: the Archers at the battlefront and the Legio Martia right behind them.
A Conscripts card is added, luckily the one with the right half shield. However, because Conscripts have a Reinforcement icon too, another card from the top of the deck must be added.
Tommy has recently reshuffled his discard pile into his deck and he’s hoping to draw the 7th Panzer Division unit he acquired before; however, the second Conscripts base card is drawn and deployed in the 4th slot, and he therefore must deploy yet another card. The correct chain of command is lost in the heat of the moment, and instead of the Panzer Division, a Spy has been sent from the top of the deck.
But the defender has a Reinforcements icon too, therefore the first card from the deck of Era II is placed on the 2nd slot of the Defender Board: the Trưng Sisters arrived.
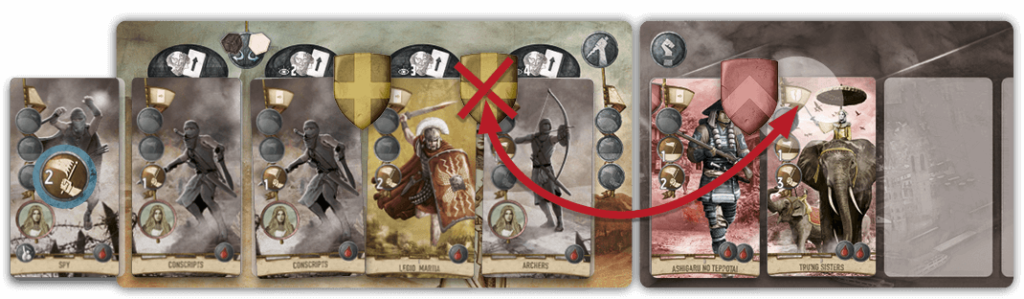
Tommy now checks for links in the battle line. His battle line has formed 2 links to the left and right of the Legio Martia. But the Assault icon of the Trưng Sisters removes the one closest to the battle front. The defender has formed a link too, but Tommy has no Assault icon in his battle line, therefore the link stays.
The situation is dire. Even if Tommy wins the combat he won’t take a Relic reward because he deployed a total of 5 cards. He still could hope to defeat at least one of the opposing units in order to add it to his Army.
He therefore puts his +2 Close Combat Warfare token on the unit that would probably be defeated last (the Spy).
He then rolls the dice. The defender gets a +1 Close Combat on their Strong die, but Tommy rolls the worst result on his Risky die: -1 to all Line of Combat. He therefore decides to spend his reroll Warfare token and rolls his die again, but he gets a -1 to Medium-Range Combat.
Both battle lines have a total value of 0 during Long-Range Combat.
During Medium-Range combat the defender wins 2-0, therefore 2 damage are assigned to Tommy’s battle line, starting from the front. The first damage goes to the Archers, defeating them. The second damage goes to Legio Martia, but they have a remaining link token, which absorbs the incoming damage and is discarded.
The Close Combat range is also a tie: 6-6, and no damage is dealt
In the end Tommy has won the combat (4 surviving units against 2), but it’s a Pyrrhic victory because he gets no Relic cards nor additional units: both the Ashigaru no Teppotai and the Trưng Sisters return home unscathed (their cards go into the Era II discard pile). The 7th Panzer Division would have saved the day for Tommy, but it was the next card on the top of his deck.
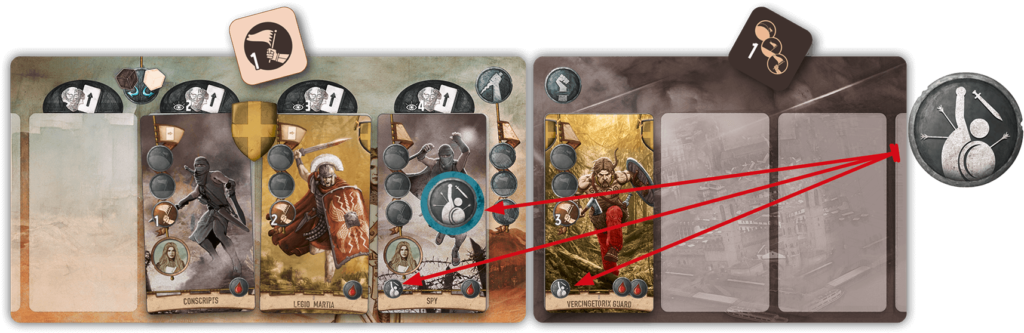
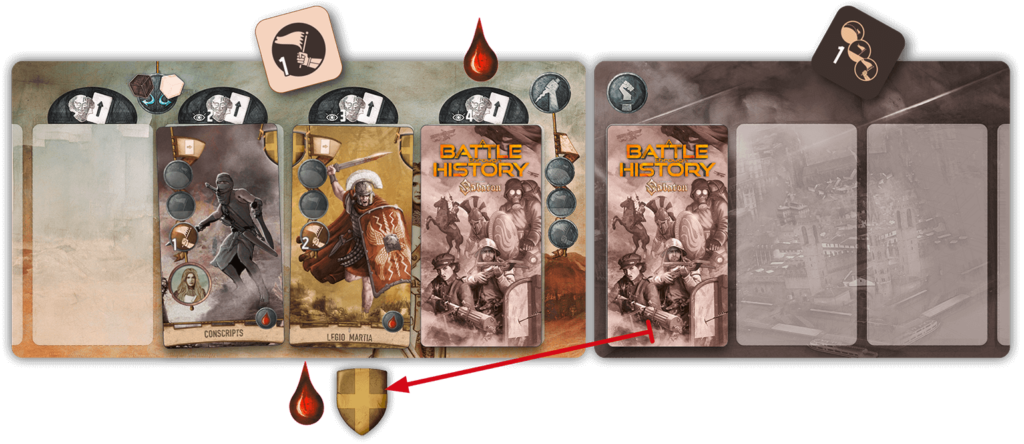
Tommy has just taken a HeroicDeath Warfare token. He wants to leverage it to take both a tougher-than-normal card and a relic at a low risk. He therefore goes to Era I and decides to fight the Vercingetorix Guard.
He deploys the Spy at the battle front, followed by the Legio Martia. He only has 1 card in his deck, therefore – by looking at his hand and his discard pile – he knows that that card is the Conscripts with the right half-shield: a perfect match.
The Reinforcements goes as planned: the Conscripts arrive but – even if they have a Reinforcements icon, no new cards enter the battle line because Tommy’s deck is now empty.
Tommy places the link token between the two cards.
He then decides to place the Heroic Death token on the Spy.
Tommy proceeds to roll the dice and gets +1 to Close Combat, and the defender the best result: +1 to all Battle Lines but for Tommy’s tactics this will be irrelevant.
During the Long-Range Combat, the defender wins 1-0, and inflicts 1 damage to the Spy, which is defeated.
However, the Spy has now 2 Heroic Death icons (one on the card itself and one from the token). Therefore, before her demise, she inflicts 2 damage at the opposing battle line.
The 2 damage is enough to defeat the Vercingetorix Guard which, however, has a Heroic Death icon too. Before being defeated it inflicts 1 damage to the Legio Martia. This would normally be enough to defeat them, but they are saved by the link token
Tommy wins the battle (2 surviving units against 0), obtains the services of the Vercingetorix Guard and also looks at 2 Relic cards, takes one and discards the other. Notice that if had deployed one less unit, both sides would have been totally annihilated, and Tommy would have taken the Vercingetorix Guard but no Relic.
Utilizziamo i cookie per essere sicuri che tu possa avere la migliore esperienza sul nostro sito. Se continui ad utilizzare questo sito noi assumiamo che tu ne sia felice.